Battle Of Britain 2013
                                                                                    Â
Battle of Britain 2013 Scenario Rules
Important: Please show up on or before 3:00 Game Clock and US Eastern Time.
The arena will be
closed to admittance at this time. If you are disconnected and can't
get back in, you can private message the CM (ROC) from the Main Arena or Lobby by
typing
".p ROC let me in" into your radio text buffer.
Sections
-
Dates and Times
-
Introduction
-
Further Introductory Details
-
Geography (Terrain)
-
Detailed Victory Conditions
-
Arena set up details and special CM factoring
-
RAF Order of Battle
-
LW order of battle
-
Additional Rules
-
Rescue Conditions
-
Credits
-
Change Log
Dates and Times
Special Events Arena (SEA) II
There is No Coordination or "Beta" Frame. Players are expected to use their time to organize and practice in advance.
- Frame 1: September 7th, 2013
- Frame 2: September 14th, 2013
- Frame 3: September 21st, 2013
- Frame 4: September 28th, 2013
Â
|
Time |
Event |
|
S = Show-Up Time (T-30) |
Players show up no later than this time. Arena locked at this time except for disco’s. |
|
T = T+0 3:30pm  Game Clock |
When takeoff happens. (Fields Open) |
|
T + 3.0 hours |
End of hostilities. (Cease Fire) |
|
T + 3h30min |
Frame ends; logs close. |
Introduction
It is July, 1940, and the fate of a nation is about to be decided.
Hitler has just given the order to begin preparation for Operation Sealion -- the invasion of Britain. France has fallen, the United States has not yet joined the war, and the Soviet Union is still Germany's ally. Britain stands alone.
The first order of battle is for the Luftwaffe to pave the way by destroying the Royal Air Force and pounding British infrastructure and cities. The Luftwaffe is mighty and skilled. The RAF is outnumbered, but it has the world's most advanced radar system -- and something just as important: an indestructible will to repel the Luftwaffe, no matter what the personal cost.
The Battle of Britain scenario will pit the RAF in its Hurricane Mk I's and Spitfire Mk I's against the Luftwaffe in its Bf 109E's, Bf 110C's, He 111, Ju 87's, and Ju 88's. The Luftwaffe will work to destroy all airfields, ports, and ships in the southeast of Britain. The RAF will do whatever it can to stop them.
The fate of Britain hangs in the balance.
Further Introductory Details
The Battle for France had been lost. The Battle for Britain had begun.
Whilst Britain girds itself against an expected invasion, Goering has finally convinced Hitler to allow him to commit his Luftwaffe to eliminating the RAF from the skies of South East England.
The broad objective is to simulate some of the strategic, tactical, geographic and logistic circumstances of the conflict between the LW and RAF fighter command during the months of August and September 1940.
The LW objective is to inflict sufficient damage to the RAF to gain total air superiority over the Strait of Dover , Kent, Sussex and the Solent approaches as well as disabling local ports for use by the Royal Navy.
Given this the initiative is with the LW and the win/lose definition will hinge on whether the LW has achieved its objectives at the end of the final frame. Points will not play a deciding roll in this scenario.
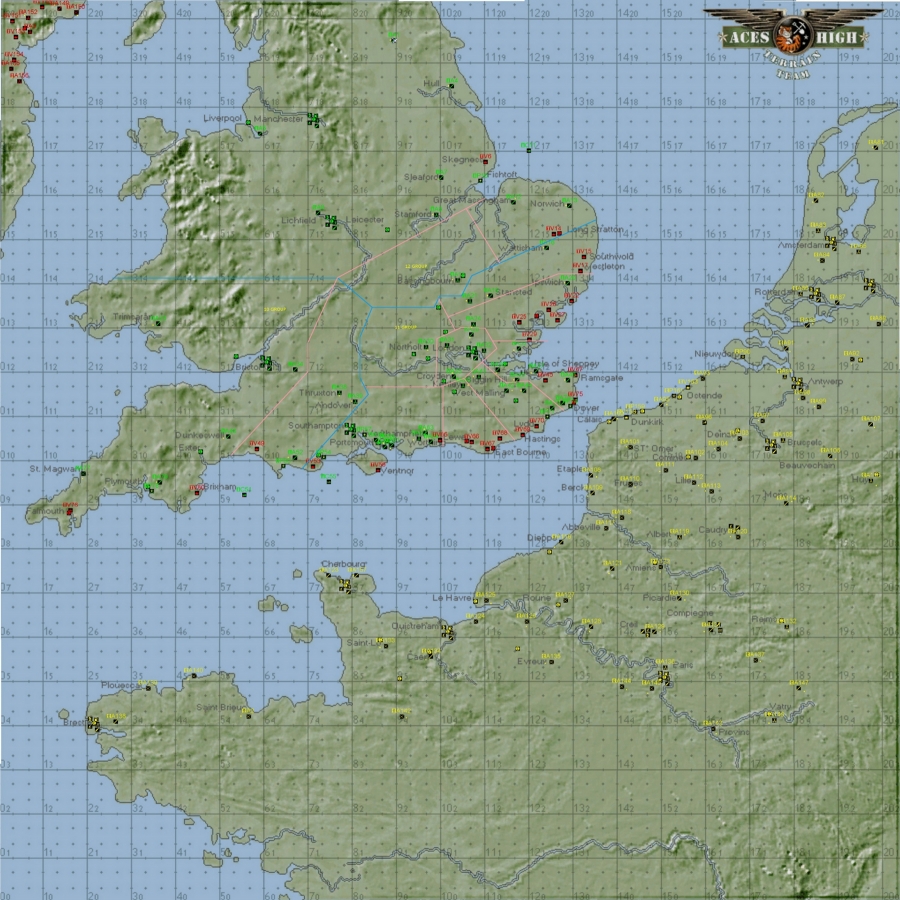
Geography (Terrain)Â
The terrain will be based on a near full sized European landscape. Fields, ports, townscapes, radar sites and shipping will be changed and added to recreate Southern England and Northern France/ Belgium. This scenario uses the "BoB40" terrain.
|
Air Fields |
||
|
Wittering A9 Stamford |
9 | |
|
Coltishall A13 Norwich |
13 | |
|
Duxford A18 Bassingbourne |
18 | |
|
Martlesham A20 |
20 | |
|
Debden A21 |
21 | |
|
North Weald A24 |
24 | |
|
Stapleford A28 |
28 | |
|
Northolt A30 |
30 | |
|
Hendon A31 |
31 | |
|
Hornchurch A32 |
32 | |
|
Rochford A33 |
33 | |
|
Colerne A34 |
34 | |
|
Croydon A35 |
35 | |
|
Gravesend A36 |
36 | |
|
Isle of Sheppey A37 |
37 | |
|
A38 Thruxton |
38 | |
|
A39 Andover |
39 | |
|
Kenley A40 |
40 | |
|
Biggin Hill A41 |
41 | |
|
West Malling A42 |
42 | |
|
Detling A44 |
44 | |
|
Manston A46 Ramegate |
46 | |
|
Warmwell A52 |
52 | |
|
Lee on Solent 58 |
58 | |
|
Gosport A60 |
60 | |
|
Thorney Island A61 |
61 | |
|
SMALL Tangmere A62 |
62 | |
|
Westhampnett A63 |
63 | |
|
Ford A64 |
64 | |
|
Lympne A72 |
72 | |
|
Hawkinge A73 |
73 | |
|
Radar bases (Vehicle fields) |
||
|
Dover |
75 | |
|
Worth |
53 | |
|
Ventnor |
56 | |
|
Poling |
65 | |
|
Truleigh |
66 | |
|
Beachy Head |
67 | |
|
Pevensy |
68 | |
|
Fairlight |
69 | |
|
Rye |
70 | |
|
Foreland (North) |
47 | |
|
Dunkirk |
45 | |
|
Canewdon |
29 | |
|
Walton |
27 | |
|
Bromley |
26 | |
|
Bawdsey |
22 | |
|
High Street |
17 | |
|
Dunwich |
15 | |
|
Stoke Holy Cross |
14 | |
|
Happisburg |
6 | |
|
76 | ||
|
80 | ||
|
49 | ||
|
25 | ||
|
Portland |
50 | |
|
Poole |
54 | |
|
Southampton |
57 | |
|
Portsmouth |
59 | |
|
Folkstone |
71 | |
|
Dover |
74 |
City/town groups around the ports.
Portland 1
Poole 1
Southampton 1
Portsmouth 1
Folkstone 1
Dover 1
Royal Navy Flotillas each one Cruiser, one or more Destroyers, but no Carriers.
HMS Portland
HMS Southampton
HMS Portsmouth
(fictitious names to show origin ports)
HQ at Stanmore
All other normal "Strat" objects removed out of the area of battle.
The RAF divided bases and terrain into "Groups" and "Sectors" (these Sectors being different than what we normally mean in Aces High by the word "sector"). The groups are 10 Group, 11 Group, and 12 Group, and are shown on the map in blue lines. Groups were divided up into Sectors. The Sectors are A (Tangmere Sector), B (Kenley Sector), C (Biggin Hill Sector), D, E (North Weald Sector), F (Debden Sector), G, J, K, W, Y, Z, and London (Hornchurch Sector). Radar-control Sectors are shown on the map in purple lines.
The most important aspect of the fields locations for the LW is that they simulate the distance and directions of approach that the LW experienced in 1940. We can leave much of this to the skill of the terrain modifier however a rough guide would be fair smattering of fields from St Malo thru Cherbourg, Caen, le Havre, Amiens, Bologne, Calais and onto Gent and Antwerp.
Detailed Victory Conditions
As stated above the LW must pave the way for a German invasion of SE England. (Operation Sea Lion). In essence the main LW strategic plank was the destruction of the RAF on the ground plus the neutralisation of the Royal Navy in the area of the English Channel (la Manche) known as the Strait of Dover (Pas de Calais).
We will define this in the following way.
Objectives by the end of Frame 4:
1) Deny the RAF use of all its airfields South of the Thames and east of the Solent.
This is achieved by the destruction of fighter hangers to a point where by fighters may no longer take off from these fields. Forcing the RAF commander to use other fields to house his squadrons. This will include those fields which were initially used by Coastal Command which falls within this area. They are all within 11 group sections Tangmere, Kenley, Biggen Hill and parts of Hornchurch that's are south of the Thames. (Croyden is considered to be within Kenley section.) Specifically, the following are the airfields that must be disabled: a58, a60, a61, a62, a63, a64, a35, a40, a41, a36, a42, a43, a44, a37, a46, a73, and a72.
2) Neutralisation of the Royal Navy local to the Strait of Dover.
2a) The Ports and Docks
All ports listed are Neutralised by taking out the Vehicle Hanger, and 50% of the ports associated city infrastructure on the port property (Not Including Ground Guns). These objectives include the South coast Ports which are based on or to the East of the Solent. (Therefore excluding the Portland & Poole facilities.) Specifically, the following ports must be disabled: p57, p59, p71, and p74.
2b)The Flotillas
The cruisers in two of the three Flotillas must be destroyed.
The German Wehrmacht will not be ready to launch Sea Lion prior to the end of Frame 4. Hence it is critical that the conditions are met at this point in time as achieving them prematurely will be to no avail if they cannot be sustained.
Arena set up details and special CM factoring
Terrain. bob40.res
Wind. 0 mph at 0-4000 ft. 5 mph from 4000 ft. to mid altitudes and 10 mph at higher altitudes. Winds will be from the S, SW, or W. Note that bomber pilots need to be aware of the effect of wind. Bomber pilots should consult the wind settings prior to initial mission in each frame. Winds will not be changed within a frame but might vary frame to frame. Wind settings will be announced prior to each frame.
Clouds. Partly cloudy as used in the practice frame (patchy clouds at various altitudes from sea level on up; thin, transparent layer at very high altitude, 40k or higher).
Icons. Short range (.icon 1).
Flotillas. The flotillas will be given separate courses between Portland (p59) and the North Foreland (v70) by the CM's. These may cross but flotillas will not escort each other.
|
Setting Name |
Value |
Explanation |
|
BomberWarningRange |
36,960 |
Bases flash when enemy is 7 miles away. |
|
CommunicationFlags |
3 |
No kill messages, ch 1 disabled. |
|
DownTimeMult |
200 |
Destroyed objects stay destroyed. |
|
ExitWhileMoving |
344 |
No exit while moving, except for gunner, boat, Joined and amphib. |
|
FighterWarningRange |
36,960 |
Bases flash when enemy is 7 miles away. |
|
FlightModeFlags |
5248 |
Formations, auto calibrate bomb sight, use ww2 planes |
|
FogVisibilityMiles |
15.0 |
15 miles visibility, or at CM's discretion. |
|
FuelBurnRateMult |
1.2 |
Fuel burn rate. |
|
GroundAutoLethality[Armored] |
1.0 |
Main Arena default. |
|
GroundAutoLethality[Hard] |
1.0 |
Main Arena default. |
|
GroundAutoLethality[Soft] |
1.0 |
Main Arena default. |
|
KillShooter |
0 |
KillShooter is off -- be careful not to shoot your own countrymen. |
|
PerkPointsDisabled |
1 |
Perk points are disabled. |
|
PlayerResupplyTime |
0 |
No resupply. |
|
RadarMode[Bishops] -- allies |
48 |
Disable friendly counters, disable enemy counters (i.e., no radar). |
|
RadarMode[Knights] -- axis |
48 |
Disable friendly counters, disable enemy counters (i.e., no radar). |
|
RadarMode[Rooks] -- allied radar control |
58 |
Tower friendly, tower enemy, disable friendly counters, disable enemy counters. |
|
RadarUpdateRate |
120 |
2 minutes. |
|
RandomRotate |
0 |
|
|
TaskGroupCommandCnt |
4 |
Be able to command some task groups. |
|
TaskGroupRespawn |
360 |
Task groups do not respawn. |
|
TowerBasedRadarRange |
264,000 |
50 mile range on radar. |
|
ViewModeFlags |
2 |
External view for bombers only. |
|
WarningFlags[Bishops] |
3 |
Base flashing only for fighters and bombers. |
|
WarningFlags[Knights] |
3 |
Base flashing only for fighters and bombers. |
|
WarningFlags[Rook] |
0 |
All off -- no base flashing. |
|
Low and Stopped Icon Multi. |
1.0 |
Standard Views to help rescue |
|
Object Name |
Hardness |
Explanation |
|
Enable Spotter Plane and PT Boats |
|
|
|
Bunk Radar |
1.5 |
Radar takes 1500 lbs to destroy. |
Fuel endurance will be based upon this concept. The RAF will have the same fuel burn multiplier as the LW.
RAF Order of Battle
The RAF may have up to 6 active third country sector controllers during any one frame. These six sector-controller positions will be recruited by the RAF and will be in addition to the 102 pilot positions available to the RAF (6 per squadron, 17 squadrons).
A typical RAF squadron will consist of 6 pilots (being half the historical strength of an RAF squadron).
Total RAF squadrons will be 17 made up of 10 Hurricane MkI squadrons and 7 Spitfire Mk I squadrons.
609 Squadron   Spitfire I   6 aircraft   Middle Wallop   A39
152 Squadron   Spitfire I   6 aircraft   Warmell   A52
Tangmere   Sector        Â
43 Squadron   Hurricane I   6 aircraft   Tangmere   A62
145 Squadron   Hurricane I   6 aircraft   Westhampnett   A63
Debden Sector        Â
17 Squadron   Hurricane I   6 aircraft   Debden   A24
85 Squadron   Hurricane I   6 aircraft   Debden   A24
North Weald Sector           Â
151 Squadron   Hurricane I   6 aircraft   Rochford   A33
56 Squadron   Hurricane I   6 aircraft   North Weald   A28
Hornchurch Sector           Â
54 Squadron   Spitfire I   6 aircraft   Manston   A46
74 Squadron   Spitfire I   6 aircraft   Hornchurch   A32
266 Squadron   Spitfire I   6 aircraft   Hornchurch   A32
Biggin Hill Sector           Â
32 Squadron   Hurricane I   6 aircraft   Biggin Hill   A41
92 Squadron   Spitfire I   6 aircraft   Biggin Hill   A41
Kenley Sector           Â
615 Squadron   Hurricane I   6 aircraft   Kenley   A40
64 Squadron   Spitfire I   6 aircraft   Kenley   A40
Northolt Sector           Â
303 Squadron   Hurricane I   6 aircraft   Northolt   A30
257 Squadron   Hurricane I   6 aircraft   Northolt   A30
LW Order of Battle
For frame 1 the following gruppen should be placed at the following active fields. These are only fields that will have planes available.I/JG2   Bf-109E4   6 aircraft   Marck   A95
II/JG2   Bf-109E4   6 aircraft         A93
III/JG2   Bf-109E4   6 aircraft   Mardyck   A91
JG3Â Â Â Â Â Â Â Â Â Â Â Â
I/JG3   Bf-109E4   6 aircraft   Samer   A117
II/JG3   Bf-109E4   6 aircraft   Colembert   A111
III/JG3   Bf-109E4   6 aircraft   Desvres   A118
JG26Â Â Â Â Â Â Â Â Â Â Â Â
I/JG26   Bf-109E4   6 aircraft   Marquise   A109
II/JG26   Bf-109E4   6 aircraft   Audembert   A108
III/JG26   Bf-109E4   6 aircraft   Caffiers   A110
JG51Â Â Â Â Â Â Â Â Â Â Â Â
I/JG51   Bf-109E4   6 aircraft   St.Omar   A132
II/JG51   Bf-109E4   6 aircraft   Wissant   A100
III/JG51   Bf-109E4   6 aircraft   Pihen   A101
JG52Â Â Â Â Â Â Â Â Â Â Â Â
I/JG52   Bf-109E4   6 aircraft   Coquelles   A96
II/JG52   Bf-109E4   6 aircraft   Peuplingues   A104
JG53Â Â Â Â Â Â Â Â Â Â Â Â
I/JG53   Bf-109E4   6 aircraft   Berck   A124
II/JG53   Bf-109E4   6 aircraft   Etaples   A125
III/JG53   Bf-109E4   6 aircraft   Sempy   A127
JG54Â Â Â Â Â Â Â Â Â Â Â Â
I/JG54   Bf-109E4   6 aircraft   Guines   A102
II/JG54   Bf-109E4   6 aircraft   Campaigne-les Guines   A112
III/JG54   Bf-109E4   6 aircraft   Hermalinghen   A111
KG53Â Â Â Â Â Â Â Â Â Â Â Â
I/KG53   He-111H  6 x 3 aircraft   Lille-Nord   A119
II/KG53   He-111H  6 x 3 aircraft   Lille-Nord   A119
KG54Â Â Â Â Â Â Â Â Â Â Â Â
I/KG54  Ju-88  6 x 3 aircraft   Evreux   A113
II/KG54  Ju-88  6 x 3 aircraft   Evreux   A113
II (St) G 1Â Â Â Ju-87 (first 2 Frames)
Bf-109E4/B(final 2 frames)   4 aircraft   Coquelles   A96
Test Group 210   Me-110  8 aircraft   Marck   A95
Rules
After T=0, pilots may go to tower only (1) upon landing at their assigned base or (2) upon being picked up by a rescue vehicle as witnessed by a CM. Rescue can occur if you ditch your plane or bail out, and can be located in the battle area. Pilots may refuel and rearm at fields other than their base fields. If you land at a base other than your assigned base and go to tower, you will be considered lost (the same as being shot down). If you ditch or bail somewhere and go to tower without a rescue vehicle picking you up and being witnessed by a CM, you will be considered lost. If you have a damaged plane, make it to a field (but not your assigned base), and are too damaged to refuel and get to your assigned base, ask for a rescue to get to your assigned base -- do not just go to tower, as you will be considered lost.
RAF
- 1) May not carry bombs.
- 2) 11 group may only launch (scramble) to known incoming LW sited via radar, the observer corps or scouts.
- 3) 10 group may only launch (scramble) when main elements of 11 group have launched.
- 4) One (only) squadron in each group may be allocated scout duties prior to scramble.
- 5) There are no limitations to scout range other than fuel limitations.
- 6) Aircraft may refuel and re arm at any available field.
- 7) There are no altitude limits.
- 8) Emergency Relocation. If a squadron's base is disabled (all FH's destroyed) during a frame, the RAF CO may assign that squadron a new base. The new base must if at all possible be in the same Group the previous base was in. The new base is not restricted to be only from among the list of bases in the table in "RAF Order of Battle" -- it can be any base within the Group as judged by the map of the terrain, given above.
- 9) Between-Frame Relocation. Squadron base fields can be moved around (between Frames, after Frame 1) within groups but not across groups. A squadron can be moved to a new base, but that new base must be in the same Group area and must be one of the bases listed in the table in "RAF Order of Battle". The squadron can be moved to a small airfield only if that small airfield will then have two or fewer squadrons based there and to a large airfield only if that large airfield will then have four or fewer squadrons based there. Note that this "bunching up" restriction and the restriction on the new base being from among the bases listed in the table is for Between-Frame Relocation -- these two restrictions are not applied to Emergency Relocation.
- 10) Downed (lost) RAF pilots will able to take up ground gunner and observation positions.
- 11) Rescued RAF pilots can re up after T = 60 minutes (see rescue below).
- 12) Damaged aircraft returning to their home/origin field may under go repair and re launch. Pilots returning to tower at other fields (unless under rescue rules) will not be able to re launch.
- 13) Note that radar stations (the vbases noted in the "Geography" section) are Rook bases that thus will shoot at both RAF and LW aircraft. If you don't want to get shot at by the auto gunners at these bases, stay out of the AA from these bases. (Consider the gunners at these bases to be twitchy and that they will shoot at any aircraft.)
- 1) JG gruppen may not carry bombs in fighters, and have one life in their primary aircraft and one life in Ju 87's.
- 2) KG gruppen may carry full bomb loads. KG has an additional life in their primary ride.
- 3) KG gruppen must set salvo to 20.
- 4) One KG gruppen may carry torpedoes each frame. Salvo requirement does not apply.
- II (St) G 1Â Ju-87 (first 2 Frames) Bf-109E4/B(final 2 frames) Final 2 frames with Bf-109E4 may carry bombs.
- 5) There are no launch time limitations.
- 6) JG may refuel and re arm at any available field.
- 7) KG may only refuel and rearm at any fields originally spawning bombers. Fields 95, 96, 113, 119
- 8) There are no altitude limits.
- 9)
Between-Frame Relocation. Frame 1 launch fields are the available airfields used throughout the event. JG groups my be relocated to any active airfields for the remaining frames. Relocation must occur prior to frame start, and not change during the frame itself. Small airfields are limited to 2 JG groups, large fields limited to 4 JG groups.KG/G1/Test Group 210 can only be moved to airfields
that have those planes enabled, A119,, A113, A95 and A96.
- 10) Downed LW pilots may take up gunner positions in any bomber.
- 11) Any bomber may take excess "walk on" gunners within arena limits. This can be in excess of your registered players, however those excess players over and above the total plane limit must not take flight.
- 12) Rescued LW pilots can re up after T = 60 minutes (see rescue below).
- 13) Damaged aircraft returning to their home/origin field may under go repair and re launch. Pilots returning to tower at other fields (unless under rescue rules) will not be able to re launch.
- 14) Pilots that have one life in primary aircraft and one life in secondary aircraft may fly at any time any aircraft in which they have a remaining life (e.g., they don't have to fly the primary first, may fly primary then secondary then primary if they didn't use up a life in primary, etc.).
- 15) Ju 88's and HE111's may be used only for level bombing and, under the limits given above, torpedo bombing. They may not be used as dive bombers.
Rescue Conditions
- Rescued pilots may not take off until past the T+60 minute mark in the scenario. In other words, if you bail or ditch, are picked up (rescued), and it is only 45 minutes after the initial starting takeoff in the scenario, you have 15 more minutes to wait until you can take off. After the T+60 minute mark, rescued pilots can take off right away.
- Pilots who return to tower other than by landing at their assigned base or via the rescue rules below will be considered lost.
- Pilots will wait to be picked up by rescue craft (Boat or Vehicle or Transport aircraft) or they will walk/swim to the nearest airfield, ship or port. Call on your country channel for rescue by one of your country's rescue craft -- please reserve channel 250 for calls for CM rescue verification as described below. Rescue happens when the rescue craft is next to the downed pilot. Thus, a PT boat or jeep must be next to the downed pilot. A C-47 must land and taxi to the downed pilot, or the downed pilot must run to the C-47, or both.
- While pilots on the ground or in parachutes may not be shot at by enemy aircraft, if a pilot ditches his plane and stays in it (as opposed to bailing out on the ground), he can still be shot at and killed by enemy aircraft. It is recommended that pilots bail from their ditched aircraft.Â
- Upon a rescue craft arriving to rescue a pilot, a CM must be called to authenticate the rescue. Where upon the pilot will return to tower and be available to fly again. Given this, the pilot will not be considered yet lost. Downed pilots ready for rescue authentication should tune to text channel 250, call for a CM to verify the rescue, give side you are on, and give precise location. Maps are divided up into sectors. We use the "dot" (or "keypad") location system to specify location within a sector. In this system, each sector is divided up into sections like the 1-9 keys on the keypad of your keyboard, as follows.
- Example: the purple "x" is in sector 13.15, at a keypad location 6. In a scenario, you'd say that the purple "x" is in 13.15.6 (or verbally "thirteen dot fifteen dot six"). Furthermore, each keypad location can be further subdivided into a keypad. If you wanted to be even more precise, you could say the the "x" is in 13.15.6.9. Use this more-precise method for reporting your location to the CM for authenticating the rescue. Thus, an example call for CM verify of rescue would be: "need cm verify, raf, 13.15.6.9".
- Bailed pilots and rescue craft shall be considered inviolate and must not be attacked under any circumstances. Penalties for violation can be applied to your team, and the shooter may be removed from the event.
- Rescue craft must not shoot at enemy aircraft or at enemy rescue craft. Penalties for violation can be applied to your team, and the shooter may be removed from the event.
- Rescue craft (boats, transport aircraft, and ground vehicles) are limited to 2 per squadron or staffel at any time under all circumstances. Thus, the RAF may have up to 34 total rescue craft in operation at any one time, and the LW may have up to 52.
- There is no limit to rescue craft lives. Rescue craft can launch from any base. Rescue-craft operators may exit to tower and launch from another base without needing to go back to base -- they can hop around as they see fit.
- Non-dead pilots may do rescue duty for a while then get back to normal combat flying. For example, a pilot may land his fighter or bomber aircraft at his normal base (or be landed at his normal base already), launch a rescue craft from any base, hop around doing rescues, exit to tower from the rescue craft (without going back to any base), and take off from his normal base in his fighter or bomber.
- Rescue Aircraft shall only operate over land and not cross into enemy territory.
- There is no restriction to rescue craft origin. It is intended that rescue craft are always available. For PT boats, at ports where vehicle hangars are destroyed (and thus PT boats would be otherwise be unavailable), the CM's will note the destruction of the VH, notify the LW and RAF CO's that the port's vehicle hangar is destroyed (so that they know additional attacks on that VH are not needed), and then restore the VH so that the port can continue to launch PT boats. Note that if the port ends up not being neutralized (i.e., the VH and more than 50% of the port's town are not destroyed), the VH will need to be destroyed the next frame, as it is counted as repaired between frames. If the port is neutralized, then the VH need not be destroyed again and is counted as destroyed from then on.
Ju 88's as divebombers
Ju 88's and He-111 are restricted to level bombing and not to be used as dive bomber.
Credits
Original Scenario design: Tilt
Terrain: Terrain Team
Rules writeup: Scenario Team
Game-day Scenario CM: ROC
RAF CO:Game ID: Stellar Forum ID:Stellaris
RAF ATC: SIM
Luftwaffe CO: Game ID: Redtail7Â Forum ID: Swareiam
Useful References
Eyewitness To History                                          Â