The Final Battle '10
The Final Battle
v10
- For all players -- all players need to read this:
- Introduction
- Dates and Times
- Summary of Rules
- Map
- For command staff (and any others interested):
- Historical Context
- Victory Conditions
- Summary of Constraints
- Order of Battle
- Frame 1
- Frame 2
- Frame 3
- Frame 4
- Movement of the Front
- Settings
- For CM's
- This is for CM convenience. No one else need read this section or pay attention to it.
For All Players -- all players need to read the following:
Introduction
April 30, 1945. Hitler is dead, and Germany is nearly fully captured. Nevertheless, Norway and Denmark are still in German control, and German High Command has been considering transferring remaining forces to Norway as a last bastion of German resistance.
What if the German High Command had followed through?
In the air, it would be the Luftwaffe vs. the British 2nd Tactical Air Force, Bomber Command, Royal Navy, and Coastal Command in The Final Battle!
It will be the Hellcat II (F6F-5), Corsair IV (F4U-1D), Lancaster III, Mosquito VI, Mustang II (P-51B), Mustang III (P-51D), Spitfire XIV, Spitfire XVI, Tempest V, and Typhoon IB vs. Bf 109-K4, Bf 109G-14, FW 190D-9, Ta 152H, FW 190A-8, Me 262, Ju 88A-4, Ar 234, and optional use of FW 190F-8's. From Denmark and Norway, across the North Sea, to the coasts of Scottland and England -- there will be dogfights in the sky, antishipping attacks at sea, and strategic bombing on land.
Please join us for The Final Battle!
Dates and Times
Show-Up Time for this scenario is 3 pm Eastern Time (3 pm New York, USA time) in the Special Events II arena. You can use this time converter to find the correct time in your time zone. Frame dates are as follows.
- February 27: test frame -- please all attend
- March 13: frame 1
- March 20: frame 2
- March 27: frame 3
- April 3: frame 4
The arena is locked to admittance at Show-Up Time, so please show up no later than Show-Up Time. (Takeoffs start 30 minutes after Show-Up Time, the time in between being used for briefings and to get organized.) If you get disconnected and need back into the locked arena, please type into any text radio buffer: ".p fencer let me in". Then keep trying to get in (even if the game shows Special Events II as being locked -- try entering still, as the status does not always update quickly). Once you are in, type ".p fencer i'm in".
Frames will run for 3 hours after takeoff, then a disengagement will be called (whereupon players will cease combat, if any), and planes will have 30 minutes to land.
Summary of Rules
- Pilots get two lives.
- A pilot uses up a life if he dies, bails, ditches, does not get a "landed successfully" message, or if he exits (end sortie) at anything other than his takeoff base (except as noted in Allies Order of Battle).
- Do not fly into the region marked "Out of Bounds" unless you are chasing an enemy into it.
- You can refuel at any base, except that land-based aircraft cannot refuel at a carrier.
- Deaths as a gunner do not subtract from your available lives.
- P-51's and Tempests cannot carry bombs or rockets.
- Lancasters and Ju 88's are restricted to 24,000 ft. altitude or less.
- Lancasters can level bomb only (no glide or divebombing).
- When you have no more lives, please volunteer to be a gunner or man a gun on a ship.
- If you get disconnected (dumped), ask the CM if you can launch again. If he says "yes," you can do so without the disco subtracing one of your lives.
- Your CO can eject you from the arena if you are not following orders, breaking rules, being insubordinate, or being a nuissance to your side.
- Do not fly off the boundary of the map unless you are chasing an enemy off the map.
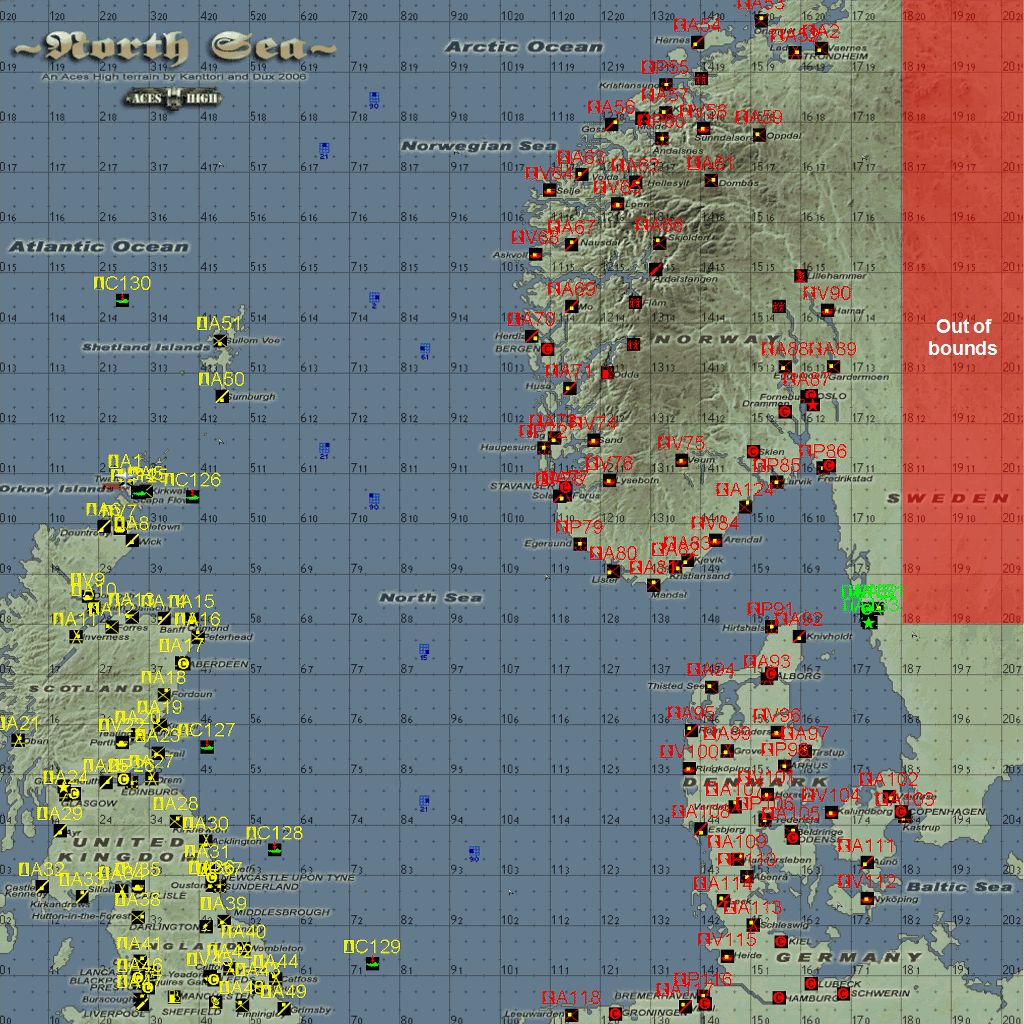
Map
For Command Staff (and any others interested):
Historical Context
Overview
After over five and a half years of war the Allies are closing in on the remnants of Germany's once mighty armed forces. Some individual units continue to fight hard while others are surrendering to the Americans and British en-mass. Their comrades on the eastern front continue to fight a desperate delaying action to slow down the advance of Russian units even as Berlin is surrounded and the Red Army advances on the Elbe River to meet the western Allies. With the complete occupation of Germany imminent, some commands and many individual units plan to fight on. The only two countries completely in the control of the Germans now are Norway and Denmark. As early as March the German's had started to plan on utilizing the country of Norway as a last bastion for continued resistance. The fjords and mountains of Norway seemed to offer refuge for leadership and combat arms alike. The remaining U-Boats are to be relocated to bases deep in the fjords and groups of them swarmed from Kiel toward Norway. Along with them go the remaining surface ships of the Kriegmarine and those few ships of Germany's merchant fleet left afloat. The Luftwaffe is in the process of evacuating its remaining combat strength to bases in Denmark and then on to Norway. Large formations of fighters are gathering in Denmark to cover the evacuation ports and air bases being utilized.
While their American allies are slowing their operational tempo, the British 2nd Tactical Air Force, Bomber Command, Royal Navy and Costal Command continue attacks on German targets. Concerned with the evacuation to Norway, which their intelligence services and reconnaissance flights had picked up, the British increase their strike tempo against targets in Norway and Denmark. Their leadership realizes that they can not allow the defeated enemy to draw back to Norway and gain space to catch their breath to provide a basis for an active guerilla resistance in Germany proper.
From the British Isles long range RAF Mustangs escort Lancasters and Mosquitoes against targets across the North Sea. Escort carriers off the Norwegian coast continue to escort convoys to and from Murmansk and make strikes against targets in central Norway. From Northern Holland and Germany, the British 2nd Tactical Air Force pursues the Luftwaffe north, continuing attacks on airfields and shipping.
Long time enemies, few from either side are left from the early days or the Battle of Britain. Yet the services had long memories, though now after the long battle from Normandy to Germany both sides were weary. Nonetheless, pilots and aircrew of both services steel themselves for the upcoming days, while deep down men on both sides know it will be The Final Battle.
Germany will have the Bf 109K-4, FW 190D-9, TA-152, Bf 109G-14, Me-262, FW 190A-8, FW 190F-8, AR-234, and JU-88A4.
Britain will have the Typhoon MkIB, Tempest Mk V, Mustang Mk III/IV, Spitfire Mk XVI, Spitfire Mk XIV, Mosquito, Lancaster, Hellcat and Corsair.
What you are about to experience never happened . . . but it could have.
Further Details
May 1, 1945. Hitler is dead, having commited suicide in his Berlin bunker the day before. The Soviets and Americans had met at the Elbe River on April 25th. Germany was cut in half. The northern forces continued to fight as they withdrew from the oncoming armies both east and west. The Luftwaffe, Wehrmacht and Kriegsmarine are but remnants of their once proud formations. Yet some units refuse to give up. In March 1945 a plan had been developed to make Norway a last redoubt. Shipping was gathered and the transfer of supplies begain almost immediately. Almost two months later the need for such a redoubt from which to continue the war was now necessary. So on the first day of May a desperate evacuation of ships, submarines, planes and men was underway from northern Germany and Denmark to Norway.
The British picked up on something going on days before, when a reece spitfire flew over Kiel and noticed the shipping concentration. Soon other signs such as the concentration of the remaining units of the Luftwaffe at bases in Denmark begain to appear. The Americans had swung south toward Czechoslovakia taking with them the bulk of their 9th Air Force. The Mighty Eighth had stood down a little over a week before ceasing missions against Germany. Yet Coastal Command, Bomber Command and 2nd Tactical Air Force were all still in the fight. The British reacted, and begain tasking their units the first day of May to stop this evacuation and reduce the infrastructure of' Norway to prevent it from being used by the Germans.
The Germans are desperate to strike a hard blow against the Allies. Even now there is hope that the course of the war can turn, if they can just knock the western allies out of the fight. Operation Seedrache has begun. From the depths of a fjord along the central coast of Norway comes a last hope. In the lead is the Goeben a Scharnhorst class battle cruiser whose hull was towed to Norway in late 1943 as Allied bombing attacks on Kiel begain. Fitted out in secret and finished only weeks ago, she leads a desperate sortie by the last of the Kriegsmarine. Armed with nine 11 inch (28 cm) guns in triple turrets and multiple anti-aircraft guns she is the lead ship of a powerful task force. She is the most powerful ship in the whole of the Atlantic. The battleships of the US Navy and Royal Navy are now deployed to the Pacific, or demobilized and rusting, their job seemingly complete. By herself she is more than a match for any convoy and could sweep the ocean of allied shipping given enough time. Yet for all this power she is not alone. With her are four destroyers and at the center of the formation comes the biggest suprise of all. She is the Moltke. Sister to the dead Tirpitz and Bismarck. Yet she is not a true sister, her decks are bare of the heavy guns her sisters carried. She has not been completed as a battleship but rather as a carrier. A rather deadly carrier, one filled with death and destruction beyond high explosive. Below her deck two ramps have been installed with another on one side of the main deck. In her hangar and stuffed below it are 250 Vergeltungswaffe-1 or as the Allies call them, "Buzz Bombs" due to the sound of their power plant. Pulsejet powered these unmanned bombs had been hitting England for almost two years now. The last attack on English soil had been March 29th. With the advance of allied armies the threat had ceased as launch sites were captured. Development begain on the F-1 version a longer range version with a larger fuel tank and reduced warhead. However the warhead need not be large now. For these V-1's have been modified to carry something other than high explosive. It is not known by the Allies what is the content of the warheads. All they know is that the Germans believe it to be powerful enough to change the course of the war. The task force will present a danger to the east coast of American and the British Isles. The Germans are sure she carries enough death and destruction to change the course of the war. She and her escorts were set to sail from their hidden base, they only awaited any other Kriegsmarine ships who could make the journey from the Baltic and the transfer of enough Luftwaffe planes to provide aircover until they are lost in the North Atlantic. Reported at the last minute by Norwegian resistance as they clear the mouth of the fjord the race is on. The Allies dare not allow them to reach the open seas.
Victory Conditions
An aircraft Loss is where the pilot dies, crashes, bails, ditches, does not get a "landed successfully" message, or if he exits (end sortie) at anything other than his takeoff base (except as noted in Allies Order of Battle).
Total = Allied Victory Points - Axis Victory Points
| Outcome | Total |
| Major Allied Victory | 500 or greater |
| Substantial Allied Victory | 300 to 499 |
| Minor Allied Victory | 100 to 299 |
| Stalemate | -99 to 99 |
| Minor Axis Victory | -100 to -299 |
| Substantial Axis Victory | -300 to -499 |
| Major Axis Victory | -500 or less |
Axis Victory Points
- 1 per enemy Loss.
- 1 per object destroyed at Allowed Targets.
- 150 per Colossus and Glory CV's sunk in frame 4.
- 100 per other enemy CA or CV sunk.
- 25 per enemy DD sunk.
- 50 if Special Munitions Factory is not completely destroyed.
- 100 per frame (to offset that scenario is based on allies having more opportunity for bombing points).
Allied Victory Points
- 1 per enemy Loss.
- 1 per object destroyed at Allowed Targets.
- 150 per Moltke or Goeben sunk.
- 100 per other enemy CA or CV sunk.
- 25 per enemy DD sunk.
- 50 if Special Munitions Factory is completely destroyed.
Summary of Constraints
In addition to any limitations listed in the "Summary of Rules" section:
- Allowed Targets (the ground objects allowed as targets each frame) are those at the Strategic Targets, at the Additional Targets, and at the enemy's list of Active Bases, listed for each frame. No other ground targets should be attacked.
- CO's may distribute players as they see fit among squadrons as long as the number of pilots in each squadron does not exceed the maximum strength listed in the Order of Battle.
- Each squadron may launch from its assigned base only (unless your CV is sunk -- see below).
- 5" guns will be disabled everywhere except on destroyers.
- Only UK bases may use air spawn, and only the air spawns shown on the frame's map.
- Each frame, CO's may assign each squadron to any Active Base
listed for the frame except for any limitations listed and except that:
- Royal Navy squadrons must use the ships listed in Order of Battle.
- Coastal Command and RAF Bomber Command must be based in the UK.
- 2nd Tactical Air Force must be based in Continental Europe, and only up to 4 squadrons can be at any single base there.
- Luftwaffe bases can handle at most 3 gruppen per base.
- Convoys and task forces must start in the highlighted areas given on each frame map, but can move however the CO wants after that.
Order of Battle
Allies ( Royal Air Force and Coastal Command) Order of Battle
Allied aircraft that launched from the UK (including air launch), instead of having to fly all the way back to UK land bases to land, will be allowed -- only if outside of icon range of enemies -- to ditch within the radar circle from any UK land base (not aircraft carriers) and have it be considered a successful landing. This is the only exception in the definition of an aircraft Loss given above in the rules. A UK-based aircraft ditching this way does not count as using up a life or count as a Loss.
Allies have a max of 136 pilots (max of 120 fighter pilots, 16 bomber pilots) distributed as follows.
| Â | Squadron | Aircraft | Max. Pilots |
| Royal Air Force, 2nd Tactical Air Force |
 |  |  |
| Â | 3 Sqn | Tempest Mk V* | 8 |
| Â | 56 Sqn | Tempest Mk V* | 8 |
| Â | 198 Sqn | Typhoon | 10 |
| Â | 609 Sqn | Typhoon | 10 |
| Â | 443 Sqn | Spitfire Mk XVI | 12 |
| Â | 41 Sqn | Spitfire Mk XIV | 8 |
| Coastal Command and RAF Bomber Command |
 |  |  |
| Â | 143 Sqn | Mosquito Mk VI | 8 |
| Â | 404 Sqn (RCAF) | Mosquito Mk VI | 8 |
| Â | 19 Sqn | Mustang III or IV (P-51B or P-51D)* | 16 |
| Â | 65 Sqn | Mustang III (P-51B)* | 16 |
| Â | 9 Sqn | Lancaster III** | 8 |
| Â | 617 Sqn | Lancaster III** | 8 |
| Royal Navy | Â | Â | Â |
| HMS Glory (C129) | 1831 Sqn | Corsair IV (F4U-1D)*** | 8 |
| HMS Colossus (C130) | 1840 Sqn | Hellcat II (F6F-5)*** | 8 |
* Tempests and P-51's may not carry bombs or rockets.
** Lancasters are limited to flying at or below 24,000 ft and can level bomb only (no dive or glidebombing).
*** Corsairs and Hellcats, if your CV is sunk, use the sister ship. If both are sunk, use a50 or a51.
Axis (Luftwaffe) Order of Battle
Axis have a max of 136 pilots (max of 128 fighter pilots, 8 bomber pilots) distributed as follows.
| Â | Gruppen | Aircraft | Max. Pilots |
| Luftwaffe | Â | Â | Â |
| Â | I./JG 2 | Fw 190D-9 | 12 |
| Â | II./JG 5 | Bf 109G-14 | 8 |
| Â | III./JG 5 | Bf 109G-14 or FW 190F-8 | 8 |
| Â | IV./JG 5 | Fw 190A-8 or Fw 190F-8 | 8 |
| Â | I./JG 7 | Me 262A | 6 |
| Â | Stab JG 11 | Ta 152H-1 | 8 |
| Â | III./JG 11 | Fw 190D-9 | 12 |
| Â | II./JG 26 | Fw 190D-9 | 10 |
| Â | II./JG 27 | Fw 190D-9 | 12 |
| Â | III./JG 27 | Bf 109K-4 | 12 |
| Â | I./JG 53 | Bf 109K-4 | 8 |
| Â | III./JG 53 | Bf 109K-4 | 8 |
| Â | Stab JG301 | Ta 152H-1 | 8 |
| Â | I./JG 301 | Fw 190A-8 or FW 190F-8 | 8 |
| Â | III./KG 76 | Ar 234 or Ju 88A-4* | 8 |
*Ju 88's (but not Ar 234's) are limited to 24,000 ft. altitude or lower. Neither Ju 88's nor Ar 234's are restricted in type of bombing (level bombing, glide bombing, and divebombing are allowed for them).
Task Forces and Convoys
Here is how to identify various types of convoys and task forces visually:
- British Convoy: Each convoy shall consist a cruiser, 4 destroyers and a carrier. The cruiser and carrier will represent merchant shipping and the points for their destruction represent that.
- British Task Force: Each Task Force shall consist of a cruiser, 3 destroyers and a carrier.
- German Convoy: Each convoy shall consist of a cruiser and 4 destroyers. These ships represent merchant shipping.
- German Task Force (Prince Eugen and Leipzig): Each Task Force shall consist of a cruiser and 4 destroyers.
- German Task Force (Seedrache): The Task Force shall consist of a cruiser (BattleCruiser), 4 destroyers and a carrier.
Frame 1 and Test Frame
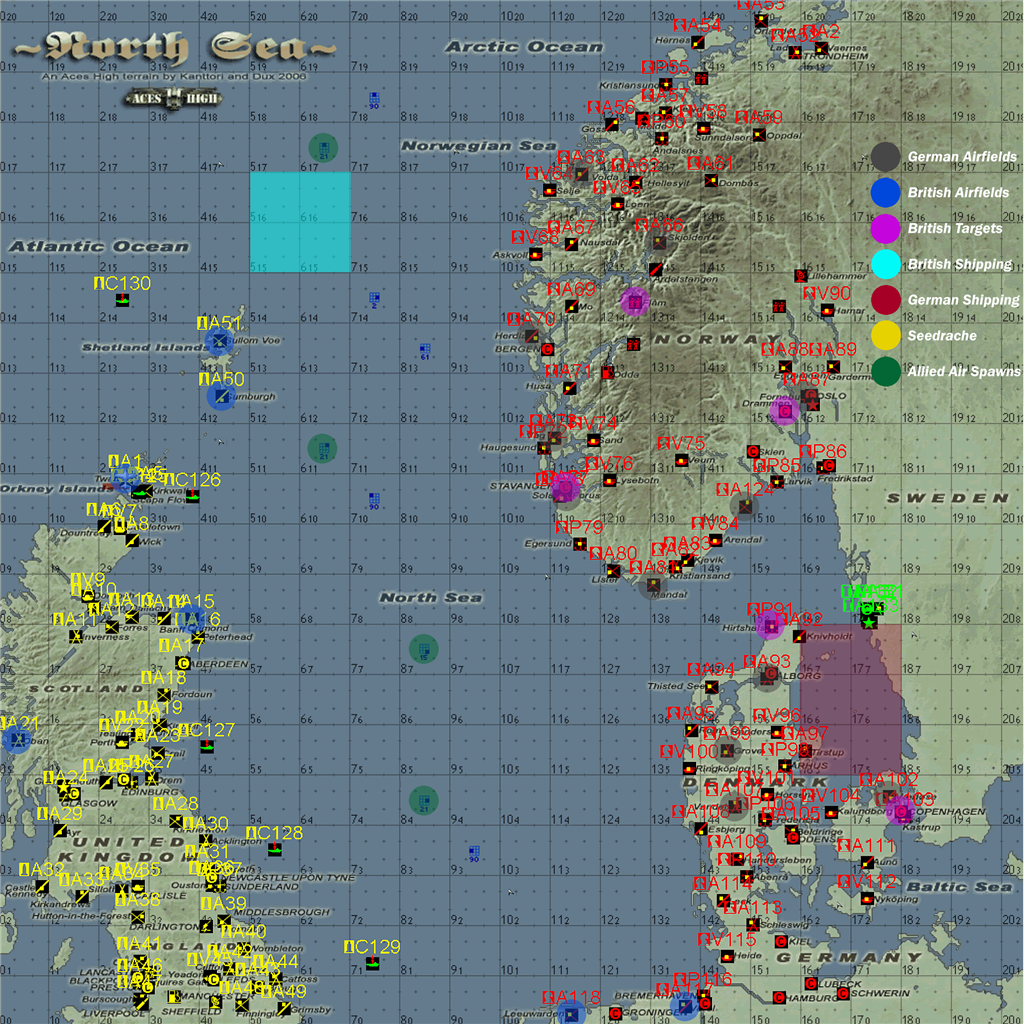
The Germans are evacuating Denmark and are setting up a new redoubt in Norwary. Currently German Forces hold all of Denmark. Two Kriegsmarine task groups are at sea heading toward Norwary form Copenhagen. These groups consist of the heavy cruiser Prince Eugen with four (4) Narvik class destroyers in one group, and the light cruiser Leipzig with four (4) Narvik class destroyers in the second group. British bombers are attacking targets in Norway. The 2nd TAF is attacking staging areas in Denmark which include airfields, cities and ports. A large convoy is returning from the Soviet Union north of the British Iles and is escorted by two Royal Navy light Carrier task forces.
Ship Setup.
- Allies
- TG (no flight enabled on CV).
- TG without one DD (F4U-1D and F6F-5 enabled) -- Glory.
- TG without one DD (F4U-1D and F6F-5 enabled) -- Colossus.
- Axis
- TG without CV -- Prinz Eugen.
- TG without CV -- Leipzig.
British Active Air Bases: A1, A15, A21, A50, A51, A117 and A118.
British Strategic Targets:
British Additional Targets:
German Active Air Bases: A63, A66, A70, A73, A77, A81, A124, A87, A93, A99, A102 , and A107.
German Basing Restrictions
The German CO must base at least JG11, JG301, JG26, JG27 and JG7 must be based in Denmark. JG5 must be based in Norwary.
German Additional Targets:
Frame One Map
Frame 2
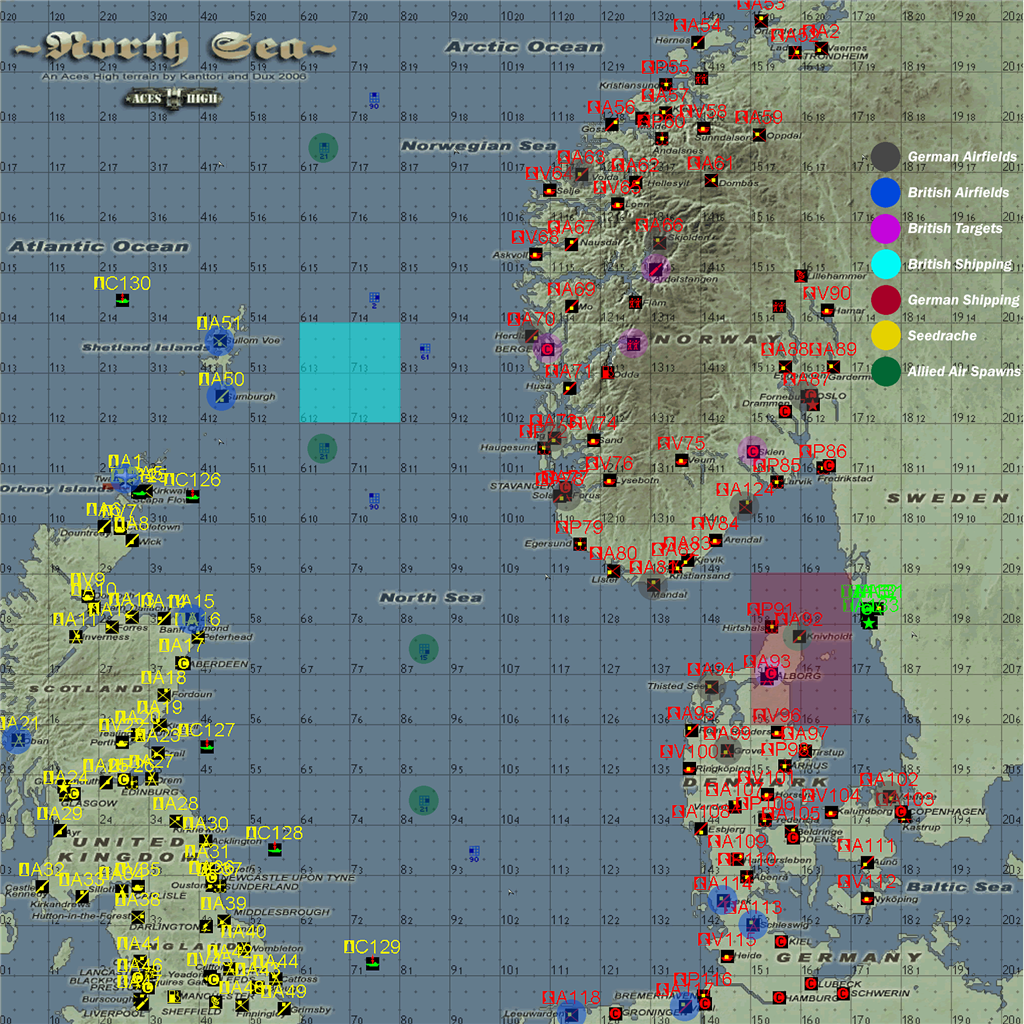
The evacuation from Denmark to Norway by elements of the Luftwaffe and Wehrmacht continues. Three troop convoys are passing through the Skagerak. The 2nd TAF continues to pressure the effort. New bases are under British control. Bomber Command and Coastal Command continue their strikes against Norway. Two Royal Navy light carrier task forces are off the coast of Norway east of the Shetlands.
Ship Setup.
- Allies
- TG without one DD (F4U-1D and F6F-5 enabled) -- Glory.
- TG without one DD (F4U-1D and F6F-5 enabled) -- Colossus.
- Axis
- TG without CV.
- TG without CV.
- TG wihtout CV.
British Active Air Bases:A1, A15, A21, A50, A51, A113, A114, A117 and A118.
British Strategic Targets:
British Additional Targets:
German Active Air Bases: A63, A66, A70, A73, A77, A81, A87, A92, A93, A94, A99, A102 and A124.
German Basing Restrictions
The German CO must base at least JG26, JG301, JG27 and JG7 in Denmark. JG5 must be based in Norwary.
German Additional Targets:
Frame Two Map
Frame 3
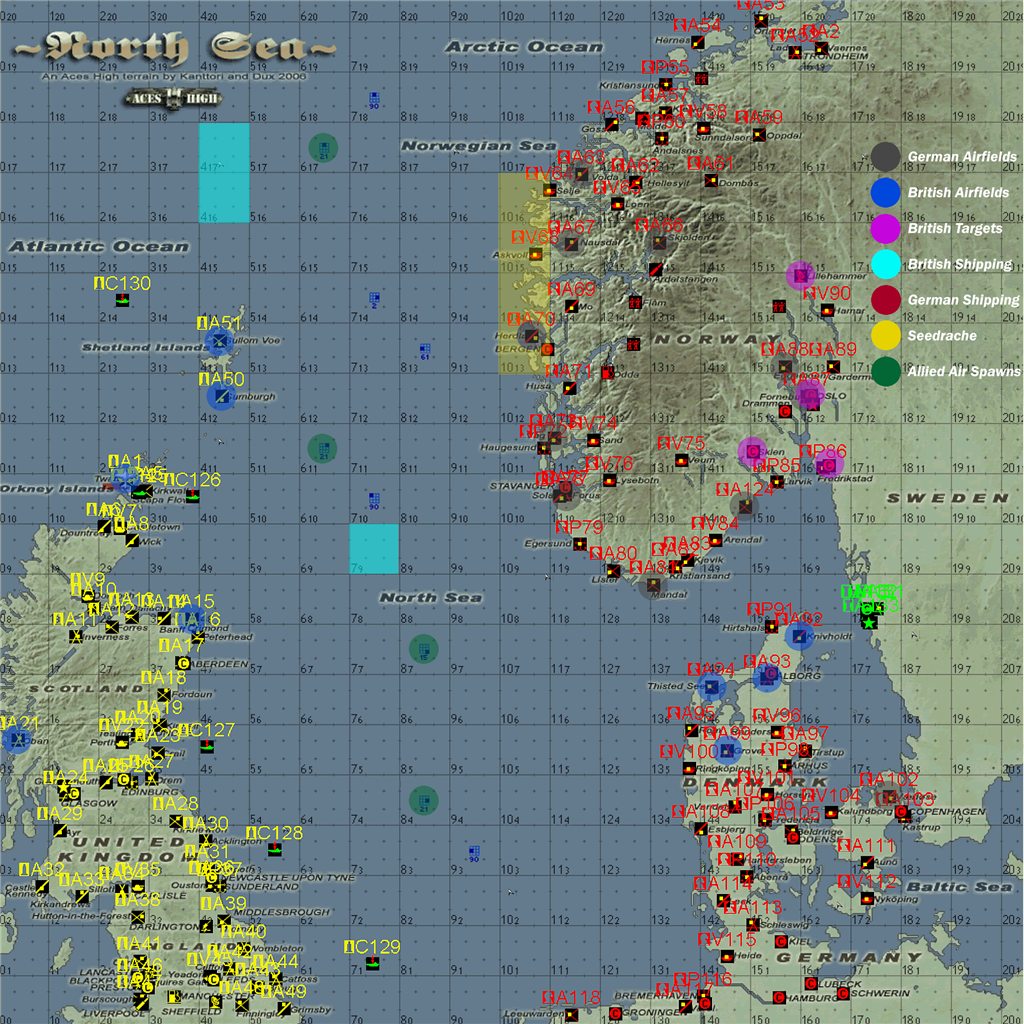
The evacuation is complete. As much material, troops, and supplies has been put on ship and sent to Norway. The Luftwaffe has relocated all of its Gruppen to Norway. Two convoys are off the southeastern coast and a single convoy is proceeding up the western coast. (see map for starting location) There are two Royal Navy light carrier task forces.
Ship Setup.
- Allies
- TG without one DD (F4U-1D and F6F-5 enabled) -- Glory.
- TG without one DD (F4U-1D and F6F-5 enabled) -- Colossus.
- Axis
- TG without CV.
- TG without CV.
- TG wihtout CV.
British Active Air Bases: A1, A15, A21, A50, A51, A92, A93, A94 and A99.
British Strategic Targets:
British Additional Targets:
German Active Air Bases: A63, A66, A67, A70, A73, A77, A81, A87, A88 and A124.
German Additional Targets:
Phase Three Map

Frame 4
Out of the depths of desperation comes Operation Seedrache. Warned at the last minute by Norwegian resistance, the Allies are scrambling to find and sink this new threat before it becomes lost in the midst of the North Sea. But even as this crisis errupts, new intelligence found in Germany itself locates a "Specal Munitions Factory" north of Oslo. This too must be destroyed before it's contents can be dispersed.
Special Rules: One Bf-109 Gruppen may base off of the Moltke. (If they use Moltke as a base and it is thereafter sunk, they can use the closest land base as their home base.) The Allies may base one squadron each of Lancasters, Mustangs and Mosquitos in Denmark. Two more task forces based around the Prinz Eugen and the Leipzig may join the Goeben and Moltke if they made Norway in their run during Frame 1.
Ship Setup.
- Allies
- TG without one DD (F4U-1D and F6F-5 enabled) -- Glory.
- TG without one DD (F4U-1D and F6F-5 enabled) -- Colossus.
- Axis
- TG (Bf 109K-4 and Bf 109G-14 enabled) -- Moltke (CV) and Goeben (CA).
- TG without CV (if survived frame 1 and if CO desires) -- Prinz Eugen.
- TG wihtout CV (if survived frame 1 and if CO desires) -- Leipzig.
British Active Air Bases: A1, A15, A21, A50, A51, A92, A93, A94 and A99.
British Strategic Targets:
British Additional Targets:
German Active Air Bases: A63, A66, A67, A70, A73, A77, A81, A87, A88 and A124.
German Additional Targets:
Phase Four Map
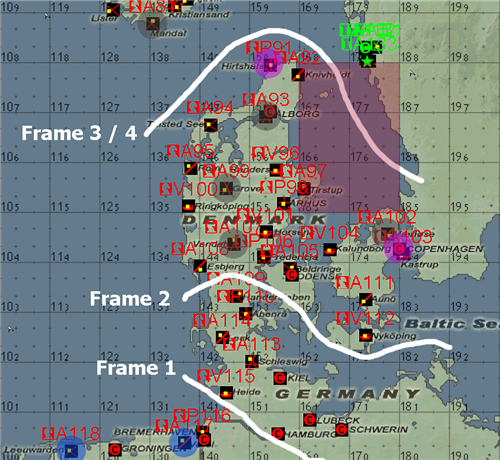
Movement of the Front
The front moves frame by frame, with more bases becoming allied. This progression is shown below, where all of the bases below the white line drawn for a frame are allied and all the bases above the white line are axis.
Settings
Weather: Weather might be varied with low-lying clouds at times mixed with medium and high altitude cloud banks. Bad weather is possible with heavy clouds at varying altitudes.
Terrain: Northsea
Wind: 0 mph at 0-4k altitude, 5 to 15 mph from one direction on up.
Radar and Sector Counters: Sector counters will show when a plane is within 50 miles of radar towers and above 1500 ft. Planes above 30,000 ft will show as dots on radar when in 75 miles of radar towers. Radar updates every 4 minutes.
Destroyed Objects: Fighter hangars, bomber hangars, ammo bunkers, fuel bunkers, and radar towers all stay down only 6 minutes after being destroyed. All other objects, once destroyed, stay destroyed the whole frame. All objects will respawn at the start of the next frame, including ships and including British CV's (simulating that there were several British CV's that could be called upon). Also note hardness of various objects below.
Auto Acks: Greatly reduced lethality, including for "puffy" ack. See setting below, where 1.0 is normal in Main Arena.
| Variable | Value | Explanation of Variable |
| ArenaFlags | 10 | Protect Objects, Perk Points Disabled |
| BomberWarningRange | 36960 | A base starts flashing when an enemy bomber gets within this number of feet. |
| ColorFog[day] | 153/164/187 | Color of fog. |
| ColorSky[day] | 135/160/196 | Color of sky. |
| CommunicationFlags | 3 | Various communication flags. |
| DeathMaxCount | 0 | After this many deaths, you have to wait DeathTimeMin before spawning the next time. |
| DeathTimeMin | 0 | How long in minutes you have to wait before spawning after DeathMaxCount deaths. |
| DownTimeMult | 6.0000 | A multiplier for down time of objects. For example, if Bunk Ammo has a Down Time of X and if DownTimeMult = Y, the actual down time for Bunk Ammo is X*Y minutes. |
| EnemyIconRange | 9000 | Enemy icon range in feet (9000 = previous .icon 1). |
| EnemyLowIconRange | 9000 | Has to do with icon range when altitude is low. |
| ExitWhileMoving | 460 | Various flags on whether or not a player can exit whilemoving. |
| FighterWarningRange | 36960 | A base starts flashing when an enemy fighter gets within this number of feet. |
| FlightModeFlags | 5248 | Formations on, auto calibration on, use WWII. |
| FogVisibilityMiles | 15.0000 | Visibility in miles. |
| FriendlyIconRange | 9000 | Friendly icon range in feet (9000 = previous .icon 1). |
| FuelBurnRateMult | 1.0000 | The multiple applied to fuel burn rate. 2.0 means fuel is used at 2x real-life rate. |
| GroundAutoLethality[Armored] | 0.04 | See "GroundAutoLethality" section. |
| GroundAutoLethality[Hard] | 0.04 | See "GroundAutoLethality" section. |
| GroundAutoLethality[Soft] | 0.04 | See "GroundAutoLethality" section. |
| KillShooter | 0 | If this is 1, you take the damage if you shoot a countryman. If this is 0, he takes the damage. |
| ObjectHardnessMults[SHP] | 3.44 | For CV hardness = 23,250 lb; CA and DD hardness = 18,600 lb. |
| PerkPointsDisabled | 1 | 1 if awarding of perk points for kills is disabled. 0 if it is enabled. |
| PlayerResupplyTime | 0 | Minutes of downtime subtracted from down objects when supplies are dropped at a base. |
| RadarAlt | 30000 | If a plane is under this altitude, it won't show on dot radar (unless full friendly or full enemy is selected). |
| RadarMode[Bishops] | 394 | Tower friendly, tower enemy, counters above radar, range based counters. |
| RadarMode[Knights] | 394 | Various flags for setting radar attributes. |
| RadarMode[Rooks] | 394 | Various flags for setting radar attributes. |
| RadarUpdateRate | 240 | Radar updates every 4 minutes. |
| RandomRotate | 0 | Whether or not a Country Reset rotates countries randomly. |
| ResetAirFieldCnt | 1 | If a country has less than this many airfields, the war is won, and the arena does a reset. |
| ResetTotalFieldCnt | 1 | If a country has less than this many total fields, the war is won, and the arena does a reset. |
| SectorCounterAlt | 1500 | If a plane is under this altitude, it's won't show in the sector counters. |
| SectorCounterRange | 264,000 | If RadarMode is set to have Range Based Counters, this is the range in feet from the radar station that a plane has to be in order to show in the sector counters. |
| StratFlags | 1 | Disable strat supply. |
| TaskGroupCommandCnt | 10 | Number of task groups one person can control. |
| TaskGroupRespawnTime | 360 | The time in minutes between the death of a task group and its respawn at its port. |
| TowerBasedRadarRange | 396,000 | The range in feet from a radar station for dots to appear on the radar display (unless full friendly or full enemy is selected). |
| VehicleWarningRange | 15840 | A base starts flashing when an enemy vehicle gets within this number of feet. |
| ViewModeFlags | 2 | Various flags for view. |
Note in the object settings below, "Down Time" is not the actual down time in minutes. Actual down time in minutes is "Down Time" times DownTimeMult given in the above table. Objects needing destruction for setup cannot be destroyed the night before, but can be destroyed several hours before the frame start.
| Object Name | Down Time | Hardness (1000 lb) | Explanation |
| Bomb Hgr | 1 | default | Bomber hangar. (Down time) * DownTimeMult = 6 minutes |
| Bunk Ammo | 1 | default | Ammo bunker. (Down time) * DownTimeMult = 6 minutes |
| Bunk Fuel | 1 | default | Fuel bunker.(Down time) * DownTimeMult = 6 minutes |
| Bunk Radar | 1 | 100 | Radar tower nearly indestructible. (Down time) * DownTimeMult = 6 minutes |
| City | -- | 0.75 | City buildings. |
| Fact AAA | -- | 0.75 | AAA factory. |
| Fact Ammo | -- | 0.75 | Ammo factory. |
| Fact Barr | -- | 0.75 | Troop training facility. |
| Fact Fuel | -- | 0.75 | Fuel refinery. |
| Fact Radar | -- | 0.75 | Radar factory. |
| Ftr Hgr | 1 | default | Fighter hangar. (Down time) * DownTimeMult = 6 minutes |
| Gun Bat | 200 | default | Down time set so that setup can be done early. |
| Gun Bat Armor | 200 | default | Down time set so that setup can be done early. |
| Gun Bat Soft | 200 | default | Down time set so that setup can be done early. |
| Hard Gun Bat | 200 | default | Down time set so that setup can be done early. |
| Ship | 200 | 5.4 | DD and CA = 18,600 lb; CV = 23,250 lb. Down time set so that setup can be done early. |
| Town | -- | 0.75 | Town buildings. |
All other settings are the default settings listed here: http://ahevents.org/images/stories/scenarios_images/defaultSettingDocument/defaultArenaSettings.html
Â
For CM's:
CM Reference
MOTD. The following can be copy and pasted to use as the MOTD, with appropriate number for frame number.
Welcome to the scenario "The Final Battle"!
Show up at or before 3 pm Eastern Time to play.
If you are not registered, you are welcome to play,
but please change to country Rook,
go to [], and type on channel 200,
"Walkon requesting assignment."
If you need back in and the arena is locked, please
enter ".p fencer let me in" into a radio text buffer
such as from the Main Arena. Try getting into the
arena thereafter even if the games says the arena
is locked -- the screen doesn't update quickly.
Once in, type ".p fencer i'm in".
Allies = Bishops
Axis = Knights
walkons = Rook
CM checklist. Prior to Show-Up Time:
- Announce to players to remind CM if he doesn't announce "logs started".
- Load terrain.
- Rotate countries if needed. Make sure axis fields are Knight, allied fields are Bishop.
- Load tables.
- Change field ownership if needed.
- Set MOTD.
- Check that correct planes are enabled at correct fields -- make sure ground guns are enabled everywhere. Save if any changes done.
- Check arena variables and resave all the non-default ones. Save if any changes done.
- Set object settings.
- Destroy any objects needed.
- Set .icon.
- Set wind.
- Remember to do .startlog before takeoffs.
- Get walkon field number for axis and allies.
- Remember ".vset locked 0" unlocks arena.
Timing Table
| Event | Real Time | Tower Clock | Event tasks |
|
S (Show-Up Time) |
3 pm Eastern, Noon PT | 12 noon |
|
| S+20 |
| ||
| S+25 = T-5 (Takeoff Countdown) |
| ||
|
T-0 (Takeoff) |
12:30 pm PT | 12:30 pm |
|
| T+3 hours | 3:30 pm PT | 3:30 pm |
|
| T+3.5 hours (Frame End) | 4:00 pm PT | 4 pm |
|
| T+3.6 hours (End Log) | 4:07 pm PT |
|
References
Luftwaffe Units in Norway on 5.10.45
The Z-Plan
RAF Banff Wing
Credits
Scenario design: Fencer
Terrain:Â Kanttori and Dux
Base Maps: Oneway
Scenario CM's: Brooke (Team Lead), Roscoroo, Newman, and Fencer
Allied CO: BearKats (BBID: Husky01)
Axis CO: 4440
Change Log
This section mentions the changes in each version, so that when changes are made to this document, people don't need to read the whole document to find out where the changes are.
Note on terminology: In this section, "Clarified" has a very precise meaning. If a rule is listed as being "Clarified", it means that the rule and its intent is not being changed but that the explanation herein is being improved to make the rule and its intent more clear. Rules re sometimes clarified during a scenario based on player questions or misunderstandings about wording.
v0.1, Â 1-09-10
-- First posting.
v1, 1/24/2010
-- Various mods.
-- Still decide what to do with British CV's are sunk for Corsairs and Hellcats.
-- Still deciding on 5" guns.
-- Still deciding on convoy vs. task force arrangement and defense.
-- Still deciding some aspects of scoring.
-- Tempests no bombs or rockets or just no bombs?
v2, 1/28/2010
-- Put in information on what if British CV's are sunk.
-- No rockets or bombs for Tempests.
-- Made a correction. There is no reduction in air spawns in frame 4.
-- LW has 8 bomber pilots, not 16, and they are not restricted to 1 life in Ar 234's.
-- No flying into Sweden (the "Out of Bounds" area on the map).
v3, 1/30/2010
-- Corrected total number listed for LW fighters.
-- Listed that Frame 1 is also setup for Test Frame.
-- If 109's are based on Moltke in frame 4, and if Moltke is then sunk, they can use the nearest land base as their home base.
-- Lancasters and Ju 88's (but not Ar 234's) are restricted to 24,000 ft or lower.
-- Lancasters (but not Ju 88's or Ar 234's) are restricted to level bombing only (i.e., no glide or divebombing in Lancasters).
v4, 2/7/2010
-- Allow 19 Sqn. to fly P-51B's if they wish (i.e., B or D are available for them).
-- No more 5 minute wait after death because the arena counts loss of a
drone as a death for DeathMaxCount. DeathMaxCount and DeathTimeMin are
now zero.
-- Since Bf 109G-14's and FW 190A-8's were previously under-represented
and because the LW has more fighters than the British, give the LW 10
fewer FW 190D-9's in exchange for 6 more 190A-8's and 4 more Bf
109G-14's. This was done by changing I/JG301 to FW 190A-8's, creating
II/JG 5 to be a Bf 109G-14 group, and adjusting the size of groups
accordingly.
v5, 2/10/2010
-- Put in staggered takeoffs to reduce load on server, warps at
takeoff, and (we hope) discos at the start. See "Timing Table".
v6, 2/20/2010
-- No changes from previous version except to take out language like "rules not yet finalized".
--
This is the released version for the scenario.
v7, 3/2/2010
-- No change to rules. Added, for CM setup reference, ColorFog,
ColorSky, and FlightModeFlags. Added Down Time specs for ships and
guns so that any of those objects needing to be destroyed for setup can
be destroyed several hours before frame start (but not the night before,
or they will respawn).
-- Corrected wind to be from 4k on up, not 5k on up. (System allows settings only in increments of 2k.)
-- Added list of ships for each frame in clearer format (so that setup is easier).
-- Corrected Additional Targets listed for each frame to correspond to
correct number of task groups listed for each frame in the 1st paragraph
description for each frame (i.e., only frame 1 had British convoy, and
all other frames are just two Royal Navy carrier groups).
v8, 3/7/2010
-- Corrected error. In frame 4 ships, Goeben is not a separate TG -- it is the CA in the TG where Moltke is the CV.
-- Added info on which bases in Denmark become allied as the frames progress (see "Movement of the Front" section).
v9, 3/19/2010
-- Clarified that the two allied real CV's (Colossus and Glory) are
worth 150 points in frame 4. Any allied CV that is a stand in for a
merchant vessel is worth 100 points.
-- Need to put in some new settings based on new server code
(ArenaFlags, FlightModeFlags) and need settings for
TaskGroupCommandCount and TaskGroupRespawnTime. Those are all added
into "Settings" section.
--15.7.2 is the location of one of the city targets for frame 2 (not 13.9.2, where there is no city).